Adding Conditional Control to Text-to-Image Diffusion Models
Adding Conditional Control to Text-to-Image Diffusion Models
Table of contents
Stable Diffusion 같은 LDM 모델을 task-specific input condition에 대해 학습이 가능하게 하는 end-to-end Network인 ControlNet 제안
훈련 데이터가 작은 경우에도 학습이 가능하고, Finetune하는 것과 비슷하게 빠름
Mobile에서 학습이 가능함
conditional을 사용할 수 있도록 기존의 diffusion을 보강가능
Introdution
Large model의 경우 짧은 prompt로 좋은 이미지를 생성할 수 있지만, 이 prompt가 원하는 것을 명확히 생성해주진 않음
따라서 large model의 이점을 극대화하기 위하여 광범위한 문제와 사용자 제어를 처리할 framework가 필요함
이미지 처리에서는 다음과 같다고 생각할 수 있음
- 각 domain에서 사용 가능한 데이터 규모는 일반 text-image domain만큼 항상 크지는 않음
\(\rightarrow\) Overfit을 피하고 LM이 특정 문제에 대해 훈련될 때 generalization을 보존하기 위한 훈련 방법이 필요 - Large computation clusters를 사용할 수 없는 경우가 많음
\(\rightarrow\) LM을 최적화하는데 빠른 훈련 방법이 필요 (memory 제약 포함) - 이미지 처리는 다양한 형태의 문제 정의, user input 또는 label을 가지고 있음
\(\rightarrow\) 여러 input type에 대해 기존 방법들을 end-to-end 방식이 필요함
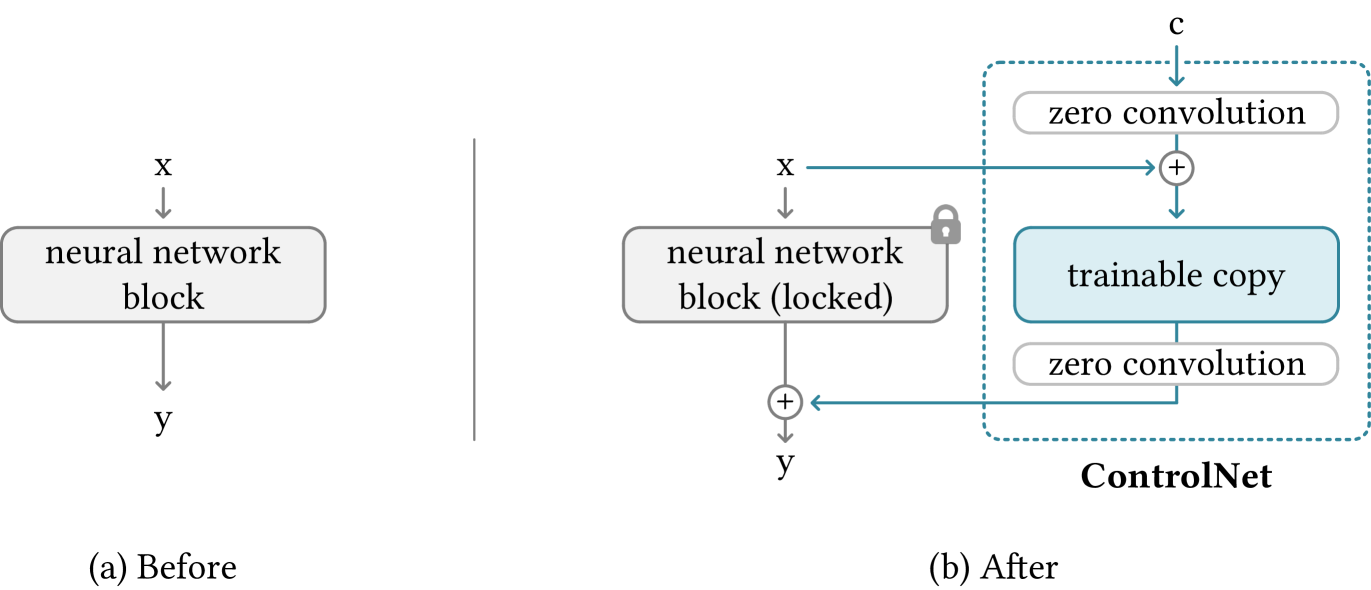
따라서, Stable Diffusion을 control할 수 있는 end-to-end인 ControlNet을 제안
\(\rightarrow\) Task-specific input conditions를 학습 가능
SD의 weight를
- Trainable copy: task-specific에 대해 훈련
- Locked copy: 기존의 Large dataset의 가중치 보존
로 복사함
Trainable은 zero-convolution과 연결되어, 0부터 점진적으로 학습됨
\(\rightarrow\) Deep feature에 noise를 추가하지 않기 때문에 finetune만큼 학습이 빠름
Method
ControlNet은 pretrain된 LM을 task-specific한 condition으로 finetune할 수 있는 architecture
ControlNet
Resnet, attention, transformer와 같은 NN block의 input을 조작하여, output을 control할 수 있음
일반적으로 input \(x\)에 대하여 NN은 다음과 같이 나타남 (a)

여기서 parameter \(\theta\)를 복사하여, trainable로 복제
trainable \(\theta_c\)은 외부 condition \(c\)와 합쳐져 훈련됨
\(\rightarrow\) 적은 dataset에서도 overfit을 피하고, large dataset의 품질을 유지할 수 있음
Zero-Convolution이라는, weight과 bias가 모두 0으로 init된 1x1 conv를 이용하여, connect (b)
Weight와 bias가 모두 0이기 때문에 처음 step에서는
\[\begin{cases} \mathcal{Z}(c;\Theta_{z1})=0 \\ \mathcal{F}(x+\mathcal{Z}(c;\Theta_{z1});\Theta_c)=\mathcal{F}(x;\Theta_c)=\mathcal{F}(x;\Theta)\\ \mathcal{Z}(\mathcal{F}(x+\mathcal{Z}(c;\Theta_{z1});\Theta_c);\Theta_{z2})=\mathcal{Z}(\mathcal{F}(x;\Theta_c);\Theta_{z2})=0 \end{cases}\]따라서, \(y_c=y\)로, 원래 network와 같음
즉, 첫 step에선 controlNet(=Zero-conv)가 영향을 미치지 않고, locked copy와 같은 output을 낸다는 것을 알 수 있음
\(\rightarrow\) Deep feature에 영향을 미치지 않음
\(\rightarrow\) NN의 capability, functionality, 결과의 품질이 유지됨
\(\rightarrow\) 또한, finetune하는 것과 비슷하게 최적화가 빠름
Gradient of Zero-Convolution
1x1 conv인 zero-convolution에서 임의의 spatial position을 \(p\), channel을 \(i\), input feature map을 \(I\in\mathbb{R}^{h\times w\times c}\)라고 할 때,
\[\mathcal{Z}(I;\{W,B\})_{p,i}=B_i+\sum^c_jI_{p,i}W_{i,j}\]로 나타날 수 있고, \(W=0, B=0 (=init)\)일 때, gradient는
\[\begin{cases} \frac{\partial\mathcal{Z}(I;\{W,B\})_{p,i}}{\partial B_i}=1\\ \\ \frac{\partial\mathcal{Z}(I;\{W,B\})_{p,i}}{\partial I_{p,i}}=\sum^c_jW_{i,j}=0\\ \\ \frac{\partial\mathcal{Z}(I;\{W,B\})_{p,i}}{\partial W_{i,j}}=I_{p,i}\neq0\\ \end{cases}\]로 나타남
따라서, input feature \(I\)의 gradient는 0이 될 수 있지만, 우리가 정작 optimization을 해야할 \(W,B\)의 gradient는 0이 아니기 때문에 zero-initialization의 영향을 받지 않음
따라서, 다음 step에서는 \(W^*\neq0\)이기 때문에 일반적인 convolution과 같은 방식으로 0에서 점진적으로 optimization이 수행됨
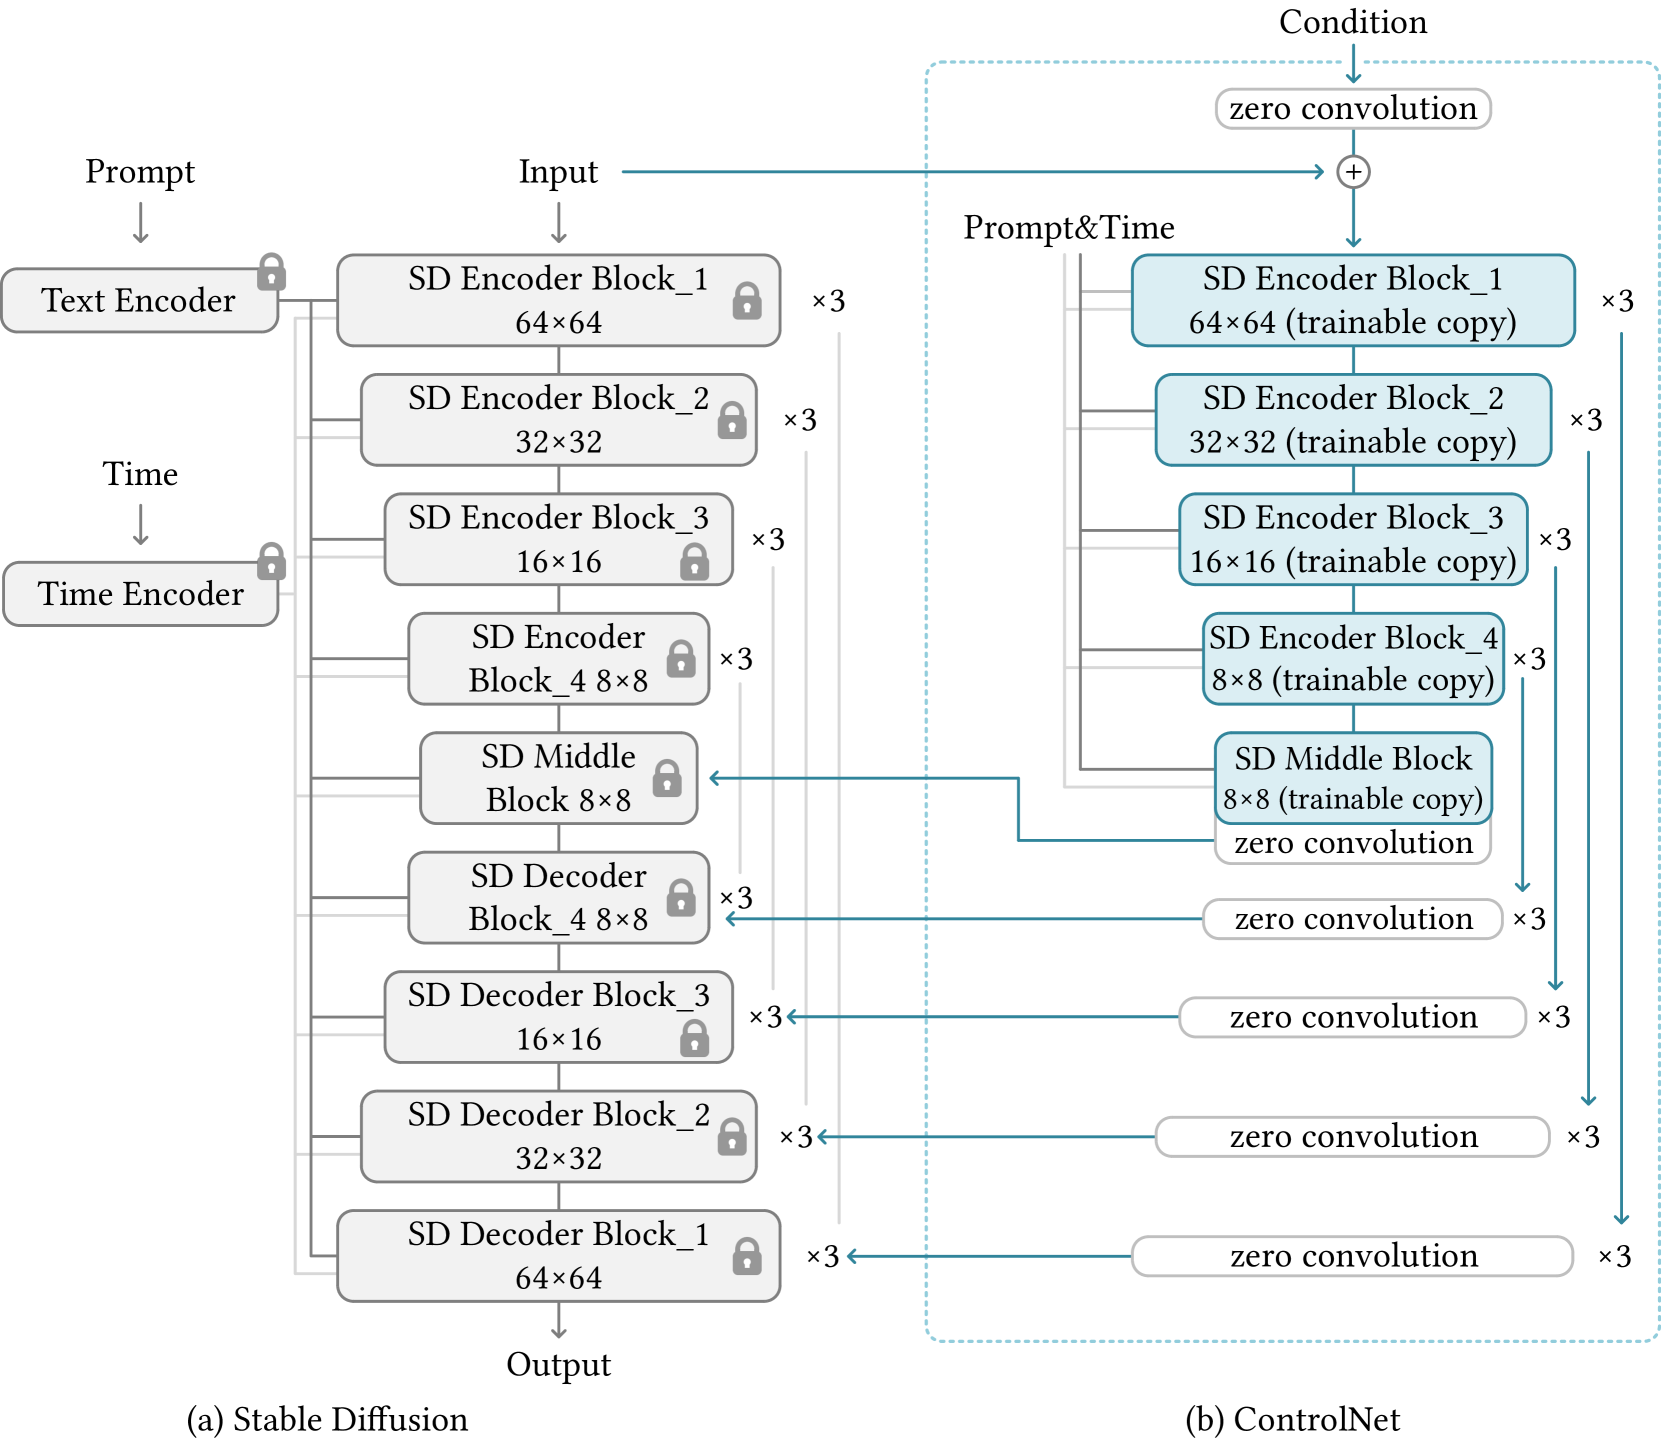
ControlNet in Image Diffusion Model
SD에 대한 간략한 설명 (논문에는 512를 말하는 듯. 내가 다운받은건 256)
- Diffusion에는 UNet을 사용
- Encoder: 12개의 block
- 8개는 resblock(4개의 resnet layer, 1개의 VIT), 4개는 downsampling
- Middle: 1개의 resblock(4개의 resnet layer, 1개의 VIT)
- Decoder: 8개는 resblock(4개의 resnet layer, 1개의 VIT), 4개는 upsampling
- Encoder: 12개의 block
- 512x512(pixel diffusion) → 64x64 (latent diffusion)로 만들기 위해 VQGAN 사용
- 따라서 ControlNet도 latent에서 동작하고, 4개의 conv layer (4x4 kernel, 2x2 strides, channel=[16, 32, 64, 128])을 사용하여 512 → 64로 encode
- condition으로 들어올 input과 image를 encode하기 위해

Training
일반적인 DM과 같이 학습함
Improved Training
Small-Scale Training
학습의 resource가 부족하면, Decoder에 대해서는 connection을 끊어도 됨
Large-Scale Training
Dataset과 resource가 많은 경우, 모든 locked를 해제해도 됨
Implementation
- Canny Edge, Hough Line, HED Boundary, User Sketching
- Human Pose (Openpifpaf), Human Pose (Openpose)
- Semantic Segmentation (COCO), Semantic Segmentation (ADE20K)
- Depth (large-scale), Depth (small-scale)
- Normal Maps, Normal Maps (extended)
- Cartoon Line Drawing
에 대해서 적용할 수 있음
Code
정확한 연결 구조에 대한 이해가 잘 되지 않아서 코드를 봄
우선, trainable 부분들은, locked 부분의 복사이기 때문에, module name이 같은 형식으로 구성되어야 함
\(\rightarrow\) 이후에 복사하기 위하여
# 같은 형식으로 정의된 pretrained_weights의 weight를 copy 해옴
# ex) model.diffusion_model.time_embed.0.weight -> control_model.time_embed.0.weight
scratch_dict = model.state_dict()

target_dict = {}
for k in scratch_dict.keys():
    is_control, name = get_node_name(k, 'control_')
    if is_control:
        copy_k = 'model.diffusion_' + name
    else:
        copy_k = k
    if copy_k in pretrained_weights:
        target_dict[k] = pretrained_weights[copy_k].clone()
    else:
        target_dict[k] = scratch_dict[k].clone()
        print(f'These weights are newly added: {k}')

model.load_state_dict(target_dict, strict=True)
torch.save(model.state_dict(), output_path)

파란 부분은, Unet 부분을 복사해옴
13개의 output 각각에 zero_conv_module을 붙임
\(\rightarrow\) stack형식으로 list에 output이 저장되어 있음
기존의 UNet을 middle까지 no_grad로 수행
\(\rightarrow\) stack 형식으로 hs list에 저장되어 있음
기존 middle output과 control의 middle output 끼리는 그냥 더 해짐
나머지는 UNet을 수행하며, skip connection 부분은 hs만 들어가는 것이 아니라, control이 더해져서 들어감
# 복사된 trainable에 대해 control output의 forward 과정
# guided는 condition을 의미

outs = []

h = x.type(self.dtype)
for module, zero_conv in zip(self.input_blocks, self.zero_convs):
    if guided_hint is not None:
        h = module(h, emb, context)
        h += guided_hint
        guided_hint = None
    else:
        h = module(h, emb, context)
    outs.append(zero_conv(h, emb, context))

h = self.middle_block(h, emb, context)
outs.append(self.middle_block_out(h, emb, context))

return outs

# Control의 전체 동작 부분
class ControlledUnetModel(UNetModel):
    def forward(self, x, timesteps=None, context=None, control=None, only_mid_control=False, **kwargs):
        hs = []
				# 기존 UNet의 encoder 부분까지 실행됨
				# hs에 skip connection을 위한 output이 쌓임
        with torch.no_grad():
            t_emb = timestep_embedding(timesteps, self.model_channels, repeat_only=False)
            emb = self.time_embed(t_emb)
            h = x.type(self.dtype)
            for module in self.input_blocks:
                h = module(h, emb, context)
                hs.append(h)
            h = self.middle_block(h, emb, context)
				# middle 끼리는 일단 더해짐
        if control is not None:
            h += control.pop()

				# 기존의 UNet과 같이 동작하지만, control 부분이 더해져서 skip connection
				# only_mid의 경우 위에서 언급했듯이 memory가 부족할 때 사용
        for i, module in enumerate(self.output_blocks):
            if only_mid_control or control is None:
                h = torch.cat([h, hs.pop()], dim=1)
            else:
                h = torch.cat([h, hs.pop() + control.pop()], dim=1)
            h = module(h, emb, context)

        h = h.type(x.dtype)
        return self.out(h)